 |
- Lag Stud Turnbuckle
- How It Works
- Installation Instructions
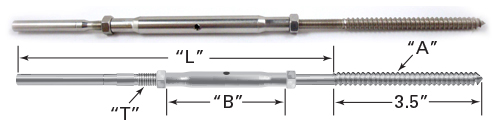 |
| Traditional Handy Crimp Lag Stud Turnbuckles | CRIMP | 316SS |
| Cable Dia. | Part No. | "A" LAG THREAD |
"T" THREAD |
"B" BODY |
"L" LENGTH |
|
| OPEN | CLOSED | |||||
| 1/8" | 10A40612 | 5/16" | 1/4"-28 | 4.250" | 8.500" | 6.500" |
| 3/16" | 10A60612 | 5/16" | 1/4"-28 | 4.250" | 8.625" | 6.625" |
| Please click part number to order. |
 |
| How It Works The “Lag” cable tensioning system has been developed for direct attachment to wood surface with a minimum of 3” of wood blocking for full thread engagement. Holes are simply pre-drilled into the connecting wood surface and the lag is threaded into the hole. Handy Crimp Tool P/N 82TST20 Required. The strength of the cable assembly is limited to the lag holding power and mounting material (solid wood blocking is required) Lag hardware is only recommended for light duty use and not for commercial use. |
| Handy Crimp Installation Guide Cable Art Inc. accepts no liability for improper use or assembly of these products. |
|||
| If you have chosen hand crimping for your project the instructions below should help you with the crimping process. Please be sure to read complete instructions before proceeding. Improper installation can result in injury! If you have any questions please call before proceeding. | |||
| Step 1 - | Make sure you have all the proper equipment and parts required. Tools required are the Handy Crimp Tool (82TST20), a cable cutter, pencil, and a sharp knife. |
||
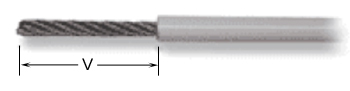
| Step 2 - | If you are using vinyl coated cable it will be necessary to strip back the coating with a sharp knife as shown below. For 1/8" cable "V" should be 1-1/2" and 1-9/16" for 3/16" cable. | ||
 |
|||
| Step 3 - | Insert stripped cable into Handy Crimp fitting and crimp 3 times as shown below. Place 3 crimps, the first 1/8" from end of fitting and two more 1/8" apart. Make sure to rotate 180 degrees for each crimp to ensure straightness of the fitting. | ||
 |
|||
| Step 4 - | Attach completed first fitting at point of beginning and run cable to the other end making sure to adjust all turnbuckles, etc. to 2/3 open position. | ||
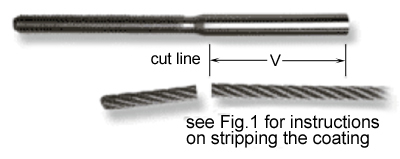
| Step 5 - | Attach loose Handy Crimp fitting to end position and pull cable tightly along side to measure for cut as shown below | ||
 |
|||
| Step 6 - | Repeat steps #2 and 3 for this end fitting. | ||
| Step 7 - | Be sure to check all crimps with micrometer or gauge supplied with tool. Diameter as measured below should be .185 for 1/8" wire and .265 for 3/16" wire. | ||
 |
|||